Can a $6 dinner actually taste like something you’d order at a restaurant?
I asked myself that the first time I made this bowl, standing over my skillet at 6pm with zero motivation to cook anything complicated.
Turns out, yes. Very much yes.
This Korean ground beef bowl has saved more weeknights in my house than I can count. It’s sweet, salty, a little spicy if you want it to be, and it comes together in one pan.
No marinating. No fancy ingredients you have to hunt down. Just a handful of pantry staples doing a lot of heavy lifting.
I first made a version of this after a trip through Seoul’s street food stalls, where I got completely obsessed with how Koreans balance sweet and savory in almost everything. This bowl is my lazy weeknight tribute to that.
Let’s get into it.
What You’ll Need
| Ingredient | Amount |
|---|---|
| Ground beef (80/20) | 1 lb |
| Garlic, minced | 3 cloves |
| Fresh ginger, minced | 1 tsp |
| Soy sauce | 1/4 cup |
| Brown sugar | 3 tbsp |
| Sesame oil | 1 tbsp |
| Rice vinegar | 1 tbsp |
| Red pepper flakes | 1/2 tsp (optional) |
| Green onions, sliced | 3, divided |
| Sesame seeds | 1 tbsp |
| Cooked white rice | 4 cups |
| Vegetable oil | 1 tbsp |
| Cucumber, thinly sliced (optional) | 1/2 |
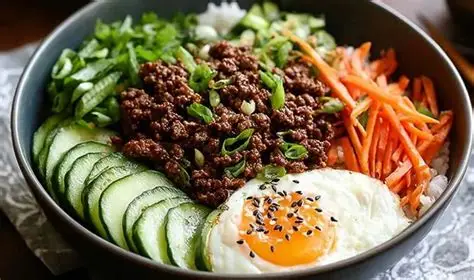
That’s it. Thirteen ingredients, and half of them are already sitting in your pantry right now.
Tools You’ll Need
- Large skillet or wok
- Wooden spoon or spatula
- Small mixing bowl
- Measuring spoons
- Sharp knife and cutting board
How to Make It
1. Mix your sauce first.
In a small bowl, whisk together the soy sauce, brown sugar, sesame oil, rice vinegar, and red pepper flakes. Set it aside. You want this ready to go before the beef hits the pan.
2. Brown the beef.
Heat the vegetable oil in your skillet over medium-high heat. Add the ground beef and break it apart with your spoon.
Cook for about 5-6 minutes, until it’s browned and mostly cooked through.
3. Add the aromatics.
Toss in the garlic and ginger. Stir constantly for about 30 seconds. This is the moment your kitchen starts smelling incredible.
4. Pour in the sauce.
Add your sauce mixture to the skillet and stir everything together. Let it simmer for 3-4 minutes, until the sauce thickens slightly and coats the beef.
5. Finish it off.
Stir in half of your sliced green onions. Remove from heat.
6. Build your bowls.
Scoop rice into bowls, top with the beef, and finish with the remaining green onions, sesame seeds, and cucumber slices if you’re using them.
Dinner is served.
Pro Tips
- Don’t drain the fat completely. A little bit of that beef fat mixed into the sauce is where a lot of the flavor lives. Just tilt the pan and spoon off the excess.
- Taste your sauce before it hits the pan. Everyone’s soy sauce is a little different in saltiness. Adjust the sugar or vinegar if it needs it.
- Use a nonstick or well-seasoned skillet. The sugar in the sauce can stick and burn on a regular stainless pan if your heat runs hot.
- Slice your green onions on a bias. It’s a small thing, but it makes the bowl look like it came from a restaurant instead of a Tuesday night scramble.
- Double the sauce if you like things saucier. Some people (me) like a lot of sauce pooling at the bottom of the bowl.
Substitutions & Variations
Ground turkey or ground chicken both work here if you want something leaner. The cook time stays about the same.
Want it spicier? Add gochujang, a Korean chili paste, along with or instead of the red pepper flakes. Start with a teaspoon and build from there.
No brown sugar on hand? Honey or maple syrup will get you close, though the flavor leans a touch different.
Swap the rice for cauliflower rice if you’re cutting carbs, or serve it over noodles for something a little different.
Vegetarian version: crumbled extra-firm tofu or a plant-based ground meat holds up surprisingly well in this sauce.
Make Ahead
The sauce keeps in the fridge for up to a week in a sealed jar, so you can mix up a batch on Sunday and have it ready for busy nights.
You can also cook the beef mixture up to 3 days ahead. Just reheat it in a skillet with a splash of water to loosen the sauce back up.
Nutrition & More
Here’s the rough breakdown per serving, based on 4 servings with rice included. These numbers are estimates, so double-check them if you’re tracking closely.
| Nutrient | Amount |
|---|---|
| Calories | ~480 |
| Protein | 27g |
| Carbs | 48g |
| Fat | 19g |
| Sodium | 780mg |
Diet swaps:
- Lower carb: skip the rice, serve over shredded lettuce
- Lower sodium: use low-sodium soy sauce, cut back to 3 tbsp
- Dairy-free: already dairy-free as written
Pairing ideas:
Kimchi on the side is almost non-negotiable in my house. A quick cucumber salad with rice vinegar also cuts through the richness nicely.
Efficiency tip:
Cook a big batch of rice at the start of your week, and this whole meal drops down to about 10 minutes of active cooking time.
Storage & Leftovers
Store leftover beef in an airtight container in the fridge for up to 4 days.
It also freezes well. Portion it into freezer bags, lay them flat, and freeze for up to 3 months.
To reheat, thaw overnight in the fridge if frozen, then warm in a skillet over medium heat with a splash of water so the sauce doesn’t dry out.
FAQ
Can I make this ahead for meal prep?
Yes. This is one of my go-to meal prep recipes. Portion into containers with rice and keep the green onions separate until you’re ready to eat, so they stay fresh and crisp.
Is this recipe actually authentic Korean food?
Not exactly. This is a simplified, weeknight-friendly version inspired by Korean flavors, closer to what’s sometimes called Korean beef bowl or bulgogi-style beef in American home cooking.
What rice works best?
Short grain white rice is traditional and holds the sauce well, but jasmine or brown rice both work fine too.
Can I use ground beef with a lower fat content?
You can, though the sauce won’t have quite as much richness. If you go leaner, add an extra half tablespoon of sesame oil to make up for it.
How spicy is this recipe as written?
With just the optional red pepper flakes, it’s mild. Most of the heat is up to you and how much gochujang or chili flakes you add.
Wrapping Up
This is the kind of recipe you make once and then keep coming back to for years.
It’s fast, it’s cheap, and it tastes like way more effort went into it than actually did.
Give it a try this week and let me know in the comments how it turned out, or if you tried any of the substitutions above. I want to hear about it.