Can two ingredients really turn into something this addictive?
I didn’t believe it either until I made my first jar of fermented cabbage and ended up eating it straight out of the jar with a fork. No toast. No hot dog. Just me, standing at the counter, going back for “one more bite” about six times.
Fermented cabbage (aka sauerkraut, but way better than the sad canned stuff) is one of those recipes that sounds intimidating until you actually try it. Then you realize it’s basically just cabbage, salt, and time doing all the work for you.
Side Note: If the word “fermented” is making you nervous, I get it. But this is the same process that’s been used for thousands of years to make food last longer and taste better. It’s not scary. It’s just science with a little patience mixed in.
By the end of this, you’ll have a jar of crunchy, tangy, slightly fizzy cabbage sitting in your fridge that’s genuinely good for your gut and even better on a sandwich. Let’s get into it.
Why This Recipe Works
Fermentation isn’t cooking. It’s more like babysitting.
You’re creating the perfect environment (salt + no oxygen) for good bacteria to take over the cabbage and turn its natural sugars into lactic acid. That’s what gives fermented cabbage its signature tang, and it’s the exact same process that makes yogurt, kimchi, and sourdough bread work.
The salt does two jobs here. It pulls water out of the cabbage to create the brine, and it keeps bad bacteria from growing while the good bacteria multiply. 🧫
No vinegar. No canning. No special starter culture. Just cabbage, salt, and a little bit of trust in the process.

What You’ll Need
| Ingredient | Amount |
|---|---|
| Green cabbage | 1 medium head (about 2 to 3 lbs) |
| Fine sea salt (non-iodized) | 1.5 tablespoons |
| Caraway seeds (optional) | 1 teaspoon |
That’s genuinely it for the classic version. I’ll cover fun variations further down if you want to get creative.
Side Note: Skip iodized table salt. The iodine and anti-caking agents in it can mess with the fermentation process and leave you with cloudy brine or a weaker ferment.
Tools You’ll Need
- Large mixing bowl
- Sharp knife or mandoline slicer
- Cutting board
- Kitchen scale (optional, but helpful for the salt ratio)
- Wide-mouth mason jar (quart size or larger)
- Fermentation weight or a smaller jar that fits inside the big one
- Clean kitchen towel or coffee filter
- Rubber band
You genuinely don’t need a fancy fermentation crock. I’ve made this recipe a dozen times in a regular mason jar and it works perfectly.
Pro Tips Before You Start
1. Weigh your cabbage for the most accurate salt ratio.
The golden rule of fermentation is 2% salt by weight. So if your cabbage weighs 1,000 grams, you’ll want 20 grams of salt. This keeps your ferment safe and consistent every single time.
2. Massage the cabbage like you mean it.
This isn’t a gentle toss. You’re breaking down the cell walls so the cabbage releases enough liquid to submerge itself. Give it a solid 5 to 10 minutes of squeezing.
3. Keep everything under the brine.
This is the one rule that actually matters. Any cabbage exposed to air can grow mold. A fermentation weight or a smaller jar pressed on top solves this instantly.
4. Burp your jar daily.
Fermentation creates gas, and that gas needs somewhere to go. Open the lid for a second once a day to release pressure, especially in the first week.
5. Trust your senses, not the calendar.
A ferment left at 65°F will move slower than one at 75°F. Taste it starting on day 3 and just keep going until it tastes the way you like it.
How to Make Fermented Cabbage
- Remove the outer leaves of the cabbage and set one or two aside. You’ll use these later.
- Quarter the cabbage and cut out the core. Then thinly slice the rest into shreds, about ⅛ inch thick.
- Weigh the shredded cabbage in your mixing bowl if you’re using a scale. Calculate 2% of that weight in grams for your salt amount.
- Sprinkle the salt evenly over the cabbage.
- Massage the cabbage with clean hands for 5 to 10 minutes. It’ll start out squeaky and dry, then slowly turn glossy and wet as the liquid releases.
- Let it rest for 15 to 20 minutes. This gives the salt more time to pull out liquid, especially if your cabbage was on the drier side.
- Pack the cabbage tightly into your mason jar, pressing down firmly as you go to remove air pockets. Pour any remaining liquid from the bowl on top.
- Check the liquid level. The brine should completely cover the cabbage by about an inch. If it doesn’t, mix a quick brine of 1 teaspoon salt per cup of water and top it off.
- Fold one of the reserved outer leaves and press it on top of the shredded cabbage like a lid. This helps keep the smaller pieces pushed under the brine.
- Add your fermentation weight on top of the leaf, then cover the jar opening with a clean towel or coffee filter secured with a rubber band. Don’t use a fully sealed lid yet since the gas needs to escape.
- Store at room temperature, away from direct sunlight, for 5 to 14 days. Somewhere between 65°F and 75°F is the sweet spot.
- Taste starting on day 3, then every couple of days after. Once it tastes tangy enough for you, seal the jar with a regular lid and move it to the fridge.
Substitutions and Variations
- Purple cabbage works exactly the same way and turns the brine a gorgeous magenta color.
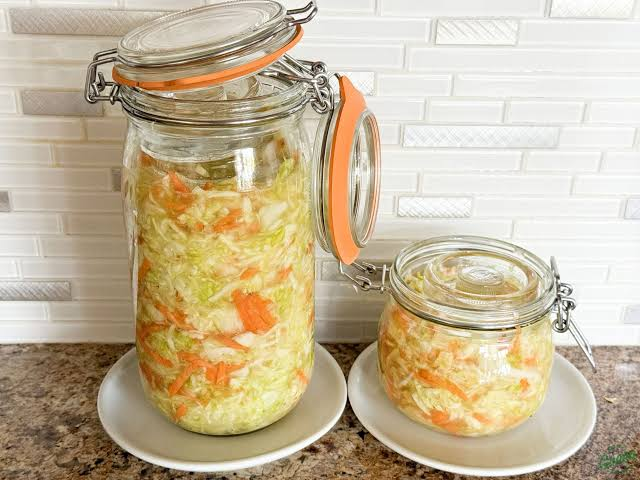
- Add shredded carrots for a little sweetness and color.
- Swap in caraway or dill seeds for a more traditional German-style flavor.
- Add sliced garlic and ginger for something closer to a kraut-kimchi hybrid.
- Try apples thinly sliced in with the cabbage for a subtle sweetness that pairs really well with pork.
Side Note: Whatever you add, keep the salt ratio based on the total combined weight of everything going into the jar, not just the cabbage.
Make-Ahead Tips
This is basically the definition of a make-ahead recipe since it needs time no matter what.
- Make a double or triple batch since it keeps for months in the fridge.
- Split one ferment into a few small jars with different add-ins (garlic in one, caraway in another) so you get variety from a single cabbage.
- Once it’s fermented to your liking, it actually gets better with a few more weeks in the fridge as the flavor mellows and deepens.
A Few More Details Worth Knowing
Nutrition (per ¼ cup serving, approximate):
| Nutrient | Amount |
|---|---|
| Calories | 11 |
| Carbs | 2g |
| Fiber | 1g |
| Sodium | 240mg |
| Vitamin C | 12% DV |
These numbers are estimates and will shift depending on how much salt actually stays in the finished kraut versus draining off. If you’re watching sodium closely, rinsing it briefly before eating helps.
Diet notes: This recipe is naturally vegan, gluten-free, keto-friendly, and Whole30 compliant as long as you’re using plain sea salt.
Pairing ideas: Fermented cabbage is incredible on grilled sausages, tucked into a reuben, piled on tacos, or served alongside roasted pork. I also just eat it straight as a snack more often than I’d like to admit.
Time efficiency tip: A food processor with a slicing attachment will shred an entire head of cabbage in under a minute if you’re making a big batch.
Storage and Leftovers
Once fermented to your liking, fermented cabbage keeps in the fridge for several months in a sealed jar. The flavor actually improves with time as it continues to mellow.
Always use a clean utensil when scooping some out to avoid introducing bacteria that could spoil the batch. And keep it submerged in its own brine as much as possible even during storage.
I wouldn’t recommend freezing it since the texture turns mushy and loses that satisfying crunch once thawed.
FAQ
Is it normal for the brine to look cloudy?
Yes. Cloudy brine is a normal sign of active fermentation. It’s actually a good thing since it means the bacteria are doing their job.
What’s that white film on top?
If it’s a thin, flat white film, that’s likely kahm yeast, which is harmless but can affect flavor. Just skim it off. If you see fuzzy spots in blue, green, black, or pink, that’s mold, and the batch should be thrown out.
Why isn’t my cabbage staying under the brine?
This usually means it wasn’t massaged enough before packing, or the jar wasn’t packed tightly. A proper fermentation weight solves this almost every time.
How do I know when it’s done?
There’s no exact day. It’s ready whenever it tastes tangy enough for your preference, usually somewhere between 5 and 14 days depending on your kitchen’s temperature.
Can I use less salt?
I wouldn’t go below about 1.5% of the cabbage’s weight. Too little salt increases the risk of bad bacteria taking over instead of the good stuff.
Do I need a special crock or kit?
Nope. A basic mason jar with a smaller jar or weight pressed on top works just as well as any fancy fermentation kit I’ve tried.
Wrapping Up
Fermented cabbage is one of those recipes that feels like a small kitchen experiment every time, and honestly, that’s part of the fun. 🫙
Two ingredients, a little patience, and suddenly you’ve got something tangy and crunchy sitting in your fridge that makes everything from hot dogs to grain bowls taste better.
Give it a try and let me know in the comments how yours turned out. I’d love to hear what mix-ins you tried, how long you let yours ferment, and any questions you’ve got along the way.