I used to avoid canning completely. Every recipe I found made 12 quarts of something, and I live in a two-person household with one small pantry shelf.
Then I found out you can can in small batches. Four jars. One afternoon. No overflowing pantry of pickles nobody asked for.
That discovery changed everything for me, and dill pickles were the first thing I tried.
Here’s the surprising part. A proper water bath dill pickle only needs a handful of pantry staples and about 30 minutes of hands-on time. The waiting is the hard part, not the cooking.
Let’s get into it.
Why Small Batch Canning Just Makes Sense
Big batch canning recipes exist for a reason. Farmers with acres of cucumbers need to process a lot, fast.
But most of us aren’t farmers.
Small batch canning gives you:
- Less waste. No more half-used bags of cucumbers going soft in your crisper drawer.
- Faster prep. You’re done before your coffee gets cold.
- Room to experiment. Try a spicy batch and a classic batch on the same afternoon.
- Way less intimidating. Four jars feels manageable. Twenty-four does not.
Side Note: This recipe uses real water bath canning, not the refrigerator pickle shortcut. That means these pickles are shelf-stable once sealed properly, and you can store them in your pantry for up to a year.
Quick Snapshot
| Prep time | 20 minutes |
| Cook time | 20 minutes |
| Processing time | 10-20 minutes (altitude dependent) |
| Rest before eating | 2 weeks minimum |
| Yield | 4 pint jars |
| Shelf life (sealed) | Up to 1 year |
What You’ll Need
| Ingredient | Amount |
|---|---|
| Pickling cucumbers (Kirby, 4-5 inches) | 3 lbs |
| White vinegar, 5% acidity | 4 cups |
| Water | 4 cups |
| Pickling or canning salt | ¼ cup |
| Fresh dill heads (or 4 tbsp dill seed) | 8 heads |
| Garlic cloves, peeled | 8 |
| Mustard seed | 2 tsp |
| Black peppercorns | 2 tsp |
| Red pepper flakes (optional) | 1 tsp |
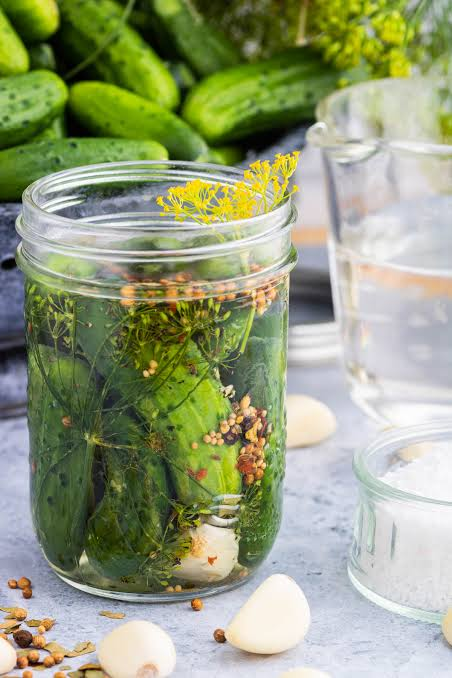
This makes about 4 pint-sized jars.
Tools You’ll Need
- 4 pint-sized mason jars with new lids and bands
- Large stockpot or water bath canner with a rack
- Jar lifter
- Canning funnel
- Small saucepan for the brine
- Bubble remover or a clean wooden chopstick
- Kitchen towels
Why This Recipe Works
The brine ratio here is equal parts vinegar and water. That’s not a random choice.
For safe, shelf-stable pickles, the acidity needs to stay high enough to prevent bacterial growth. A 1:1 vinegar to water ratio with 5% acidity vinegar keeps you solidly in safe territory.
Cutting the vinegar to “make it milder” sounds tempting. Please don’t. This is one spot where following the ratio actually matters for your safety, not just the flavor.
How to Make Small Batch Dill Pickles
- Wash your jars. Run them through the dishwasher or wash with hot soapy water. Keep them warm until you’re ready to fill them.
- Prep the cucumbers. Trim off the blossom end (it has an enzyme that makes pickles mushy). Slice into spears, rounds, or leave whole if they fit your jars.
- Sterilize the jars. Boil your jars in the water bath canner for 10 minutes, or run them through a sanitize cycle in the dishwasher.
- Make the brine. Combine the vinegar, water, and salt in a saucepan. Bring to a boil, stirring until the salt dissolves completely.
- Pack the jars. Add 2 dill heads, 2 garlic cloves, ½ teaspoon mustard seed, and ½ teaspoon peppercorns to the bottom of each jar. Pack cucumbers in tightly, leaving ½ inch of headspace at the top.
- Pour the brine. Ladle the hot brine over the cucumbers, keeping that ½ inch headspace. Use your bubble remover to release any trapped air pockets.
- Wipe and seal. Wipe the jar rims clean with a damp towel (any brine residue can prevent a proper seal). Place lids on and screw bands to fingertip tight.
- Process in the water bath. Lower jars into boiling water using your jar lifter. Water should cover jars by at least 1 inch. Process for 10 minutes (adjust for altitude, see chart below).
- Cool and check the seal. Remove jars and let them sit undisturbed for 12-24 hours. You should hear a satisfying pop as each lid seals. Press the center of each lid. If it doesn’t flex, you’re sealed.
Altitude adjustments for processing time:
| Altitude | Processing Time |
|---|---|
| 0-1,000 ft | 10 minutes |
| 1,001-6,000 ft | 15 minutes |
| Above 6,000 ft | 20 minutes |
Pro Tips
- Use the freshest cucumbers you can find. Pickles made from cucumbers picked more than a day or two ago tend to turn out soft instead of crunchy. Farmers market cucumbers beat grocery store ones almost every time.
- Add a grape leaf or a pinch of calcium chloride if you want extra crunch. Both contain compounds that help cucumbers hold their firmness through processing.
- Don’t skip the blossom end trim. It sounds like a small detail, but that little enzyme really does turn crisp pickles into soft ones over time.
- Label your jars with the date. Six months from now, you will not remember when you made these. Trust me on this one.
- Let them sit for at least two weeks before eating. I know it’s tempting to crack one open immediately. The flavor actually develops and deepens the longer they sit, up to about a month.
Substitutions and Variations
Want to switch things up? Here’s where you have room to play:
- Spicy version: Double the red pepper flakes and add a sliced jalapeño to each jar.
- Sweet and tangy: Swap ¼ cup of the vinegar for apple cider vinegar and add 2 tablespoons of sugar to the brine.
- Garlic dill overload: Bump the garlic up to 4 cloves per jar if you’re a garlic person like me.
- No fresh dill? Dill seed works just as well and is often easier to find outside of summer months.
- Zucchini instead of cucumbers? It works, though the texture ends up a bit softer.
Make Ahead Tips
This whole recipe is technically a make ahead project. That’s the beauty of canning.
- Prep your brine up to 3 days ahead and store it in the fridge. Just reheat before using.
- Wash and trim cucumbers the night before and store them in the fridge wrapped in a towel.
- Once sealed and cooled, jars can sit in your pantry for up to a year before opening.
Storage and Leftovers
Sealed jars belong in a cool, dark pantry. Skip the spot above your stove or near a sunny window. Heat and light break down the quality faster than you’d expect.
Once you open a jar, it moves to the fridge. Refrigerated, opened pickles stay good for about 2-3 months.
If a lid didn’t seal properly within 24 hours, don’t panic. Just move that jar straight to the fridge and treat it as a refrigerator pickle. Eat it within a few weeks.
FAQ
Do I need a special canner to do this?
Nope. Any large stockpot works as long as it’s deep enough to fully submerge your jars with an inch of water on top. A rack at the bottom (even a folded towel) keeps jars from touching the direct heat.
Why are my pickles mushy?
A few likely culprits: old cucumbers, skipping the blossom end trim, or processing for too long. Stick to the times listed above and use the freshest cucumbers you can find.
Can I reuse old lids?
No. Canning lids are one-time use. The sealing compound only works properly once. Bands can be reused, but always grab fresh lids.
How do I know if a jar is actually sealed?
Press the center of the lid after it’s cooled for 24 hours. If it doesn’t pop up and down, you’ve got a seal. You can also tap it. A sealed jar makes a higher pitched, clearer sound.
Is it safe to reduce the vinegar for a milder taste?
No, and this one matters. The vinegar to water ratio keeps the acidity level safe for shelf storage. If you want milder pickles, cut back on the garlic or pepper flakes instead.
Why do my pickles turn cloudy in the jar?
This is usually just mineral content in your water or salt reacting in the brine. It’s harmless. If a jar looks cloudy and also smells off or has bulging lids, that’s a different story and should be tossed.
Can I make this with less sugar or no salt substitutes?
Stick with pickling or canning salt rather than table salt, which contains anti-caking agents that can cloud your brine. This recipe doesn’t call for sugar at all, so there’s nothing to adjust there unless you’re trying the sweet variation above.
Wrapping Up
Small batch canning turned something I used to avoid into one of my favorite kitchen projects.
Four jars, one afternoon, and pickles that actually taste like something you made on purpose.
Give this recipe a try and let me know how your batch turns out in the comments. I’d love to hear if you tried any of the variations, or if you have a family trick that makes your pickles extra crunchy.
Got questions before you start? Drop them below and I’ll get back to you.